Starting a School Makerspace from Scratch
Successfully launching a school makerspace includes community buy-in, generating a student buzz, finding cheap or free resources, and building maker activities into the curriculum.
Your content has been saved!
Go to My Saved Content.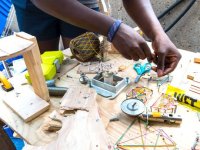
With the behind us, you might be ready to start a makerspace in your school -- but not know where to start. Will purchasing a costly 3D printer and the latest robotics kit ensure learning and maker success? What are some steps to starting a successful makerspace from scratch?
Step 1: Immerse Yourself in Maker Education
Before you can build your own community of makers, you need to join one! Immerse yourself in makerspaces by joining a summer maker camp like or the virtual Camp Google for cheap and easy STEM ideas, but most importantly: make stuff! Go to the public library or a community makerspace and learn Arduino, coding, etc. Some easy ways into coding are the and . Institute a family maker time at home and make low-tech, STEM-related crafts with little ones, like this or this .
Step 2: Get Others Involved
Start a steering committee for your makerspace by involving interested teachers and students. Include your committee in purchasing decisions, goal setting, workshop ideas, and even leading makerspace programming. Learn from other schools and students about what they do by reaching out with Skype or Google Hangouts.
If you can, reach out to the community and get parents and community members involved. You'll also engage students if you enlist mentor experts. Start by finding student experts in your school and around your community. Utilize Twitter or to branch out. Our students love connecting with other maker students around the country, as well as maker experts like .
Step 3: Purchasing Makerspace Resources
Here are three guidelines:
- What purchases will give you the most bang for your buck? Will buying a 3D printer break your budget?
- Write grants, ask your PTA for funds, or use crowdsource funding like or GoFundMe. You can sign up for monthly emails about grant opportunities from .
- Ask for old electronics, popsicle sticks, balloons, old car toys, old electronic toys, wire cutters, old telephone wire, old tennis balls, etc. You’ll find lots of great STEM lessons at past . Follow STEM accounts and other makerspaces on Instagram, and scour Pinterest for cheap ideas.
Step 4: Building a Community of Makers
Immerse your students in maker supplies. Just as surrounding kids with books motivates them to read, surrounding them with tinkering tools motivates them to create. You don't need a special room for your makerspace. All you need are maker resources, somewhere to store items, and a beginner's knowledge of how to use your resources.
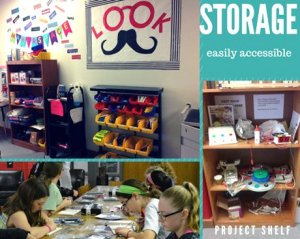
Once I moved our makerspace materials from the back room into an easily accessible area behind our circulation desk and instituted a project shelf, our students started tinkering every day!
Step 5: Hosting Workshops and/or Design Challenges
One of the most important aspects of starting a makerspace is getting the pulse of your community. I have an "iWanna" box on the circulation desk, and the first successful design challenge at Lamar was born from a student idea that ended up there. That student wanted to create catapults, so we ended up throwing down a to Diana Rendina's class in Florida, and they in turn challenged us to create games in Scratch and invent controllers with .
Students also love tinkering with Snap Circuits, littleBits, Knex, Lego, Makey Makey, Sphero, and Scratch during our maker mornings (see a resource list ) -- although just owning all of these resources is not going to ensure that making leads to learning. Let kids tinker and play, but eventually, you'll have to guide their learning by creating design challenges.
Design challenges teach problem solving and creative thinking, and they're one of the easiest ways to create a community of makers. Makey Makey co-inventor Jay Silver declares, "Design challenges are so important. . . it introduces time limits, a focused theme, and ends with a show and tell." You can show off student creations by hosting a mini-maker faire, connecting your makers with other students via Skype and Twitter chats, or showcase projects on other social media.
Here are some design challenge ideas that worked for me:
- Host a challenge, and challenge students to incorporate to make a "smart" course.
- Host a to entice students into creating video games, not just consuming them.
- Make your classroom or library an interactive space with Makey Makey. Let kids design interactive spots in your room (see my ).
Step 6: Integrating Maker Education Into the Curriculum
While tinkering can lead to learning, remember that makerspace programming can also support classroom curriculum. Here are some ideas for incorporating making in the classroom:
- in ELA, science, math, and music
- in science and physics lessons
- prototyping kits for math concepts:
- Design thinking
What are some goals that you'd like to set for your school makerspace? Have you incorporated any great makerspace lessons in classrooms at your school?