When Life Gives You Mud, Make Science
With the simplest ingredients, teachers can show their students how the natural world around them works—and how to protect it.
Your content has been saved!
Go to My Saved Content.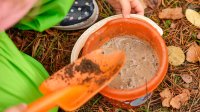
It was one of those mornings, with heavy rain, fallen trees, and poor visibility around my home in the mountains of North Carolina. A landslide blocked the main road to my school, and part of the Blue Ridge Parkway collapsed.
I arrived at school two hours late, much to the annoyance of my hybrid fourth-grade class. They wanted to know why I was late. When I explained to them what had happened, they wanted details: “What made the road fall down the mountain? How will they fix it? Will it happen again?”
“Hmmm. This could be a learning moment,” I thought to myself.
Landslides
The next day, before class, I created a “mountain”—a pile of dirt—on an old pizza pan and filled a bottle of water. When class started on Google Meet, I positioned my phone over the mountain using a clip on a gooseneck stand and a light that I had bought for experiments like this, so the kids could get a close-up perspective. (The round shape of the pizza pan makes it a little easier to film from different angles.)
I used my finger to trace the parkway at the top of the mountain and then traced a road leading down the mountain. Then I positioned Unifix cubes on the mountain to represent houses, and a few small base 10 blocks to represent cars. Next, I slowly poured water from my bottle onto the top of the mountain to simulate the heavy rain we’d been having. Presto: My students had a close-up view of the resulting landslide that had taken out both roads the previous morning.
My students were so fascinated that we did the experiment more than once. I then challenged them to come up with a way to save the parkway from another landslide—in their own backyards.
The students’ ideas for protecting the parkway ranged from building walls with pebbles and sticks to creating tunnels out of empty paper towel rolls to carry the mud and water away from the road. They turned into engineers and took notice of the ways in which we protect our roads and the structures around them.
Most of my students live in a rural area, so going outside is safe for them, but I did email their parents and explain why their kids were going to be playing in the mud. The project was optional, and I encouraged the students who weren’t able to get their hands dirty to share their ideas with their classmates who could.
River Deltas and Storms
To replicate storms and the formation of river deltas, I fill the pizza pan with about one inch of loose dirt. Then I pour water slowly from one spot near the edge of the pan. By the time the bottle is empty, the beginnings of river channels and small lakes appear. Sometimes I add fine glitter to the soil so that my students can track how topsoil is displaced from one place to another.
I can also simulate a Hurricane Katrina–like storm by pouring a large amount of water very quickly on the edge of the pan; students can observe how Unifix cubes or other props representing houses react during floods. Students can then find ways to protect the “homes” from flooding.
Wind and Water Erosion
I’ve given my students straws and paper towel and toilet paper rolls to blow through, together with water bottles, and challenged them to make the Grand Canyon or Monument Valley. We’ve used toothpicks to simulate dinosaur bones and buried them using “wind” and water and then uncovered them the same way to show why there are so many fossils in the Badlands. This project works best on a pizza pan or cookie sheet; you can raise it up to eye level for the kids so they can envision how their creations would look if they were walking through them. You can also take pictures and use it for a science fair project.
Volcanoes
We’ve all seen the papier-mâché science fair projects with their baking soda and vinegar lava, but doing something similar with mud can be a little more true to life.
For example, it can demonstrate how the Hawaiian Islands were formed. I pack mud around a medium-sized empty water bottle and in a small layer on my trusty old pizza pan to make an island. Then I stick Popsicle sticks at various locations on the flat part of the mud and make a mark on each Popsicle stick that is level with the surface of the mud. I add a large amount of baking soda and vinegar lava in the water bottle and add glitter. As the volcano erupts, it washes mud from around the water bottle down onto the flat part of the island.
Then I pack more mud around the volcano and repeat the process; the island grows each time the volcano erupts. The glitter allows the kids to see just how much material is coming from inside the volcano itself, differentiated from the original layer of mud that forms the island, so they can better understand that most of the mass of the Hawaiian Islands came from inside volcanoes (indeed, from hot spots deep inside the Earth).
After several eruptions, we mark the level that the mud has risen to on the Popsicle sticks and pull them out so the students can measure how much their island has grown. Then we compare aerial views of our island with photographs of real volcanic islands.
I’ve also used this method to demonstrate the AD 79 eruption of Mount Vesuvius, with flat glass marbles placed to represent Pompeii and Herculaneum. I add glitter to the baking soda and vinegar concoction again so students can see not only the speed at which these cities were covered but the extent to which they were buried.
Tips and Considerations
I usually do these experiments from the setup to the cleanup live and record them so that my students who don’t have reliable internet access can view them when they do. The recordings also serve as a how-to guide for the parents. I post the recordings immediately after class with a list of materials needed for both students and parents so they can re-create them at home.
I started doing mud projects when working with ELL students overseas—it’s much easier to teach science concepts and vocabulary when students are able to work hands-on and actively participate in the learning process. And no matter what the country, I can find mud or sand.
Recently I’ve adapted the projects for use in remote and hybrid classrooms for the same reasons I used them overseas: Remote learning makes so many of our students mere spectators rather than active participants in the learning process. Simple projects such as these that use readily available household items make students a part of their own learning again.
When doing these projects, it’s important to keep in mind that we are learning about geological processes and not about disasters. While telling students statistics about recent disasters may be a good way to get their attention, it can distract from the purpose of our lesson. Also, we don’t always know what our students’ life experiences have been—how their lives might have been disrupted by a weather or geological event, perhaps to the point of tragedy. As was the case with my class’s Blue Ridge Parkway project, the emphasis needs to be on preservation, not destruction, when possible.